A Complete Guide To Understanding DPI
Discover the impact of DPI on printed images and learn how to optimize image quality.

Cassie Viele
Published Apr 18, 2018
 Nailing down just what DPI is (and why we should care) beyond the obvious "Dots per Inch" can be a very elusive task. If you want to read all the details, you can check out my post about the difference between DPI and PPI. If you just want to get to the bottom of what DPI is and how it affects you, read on.
 Getting To Know DPI
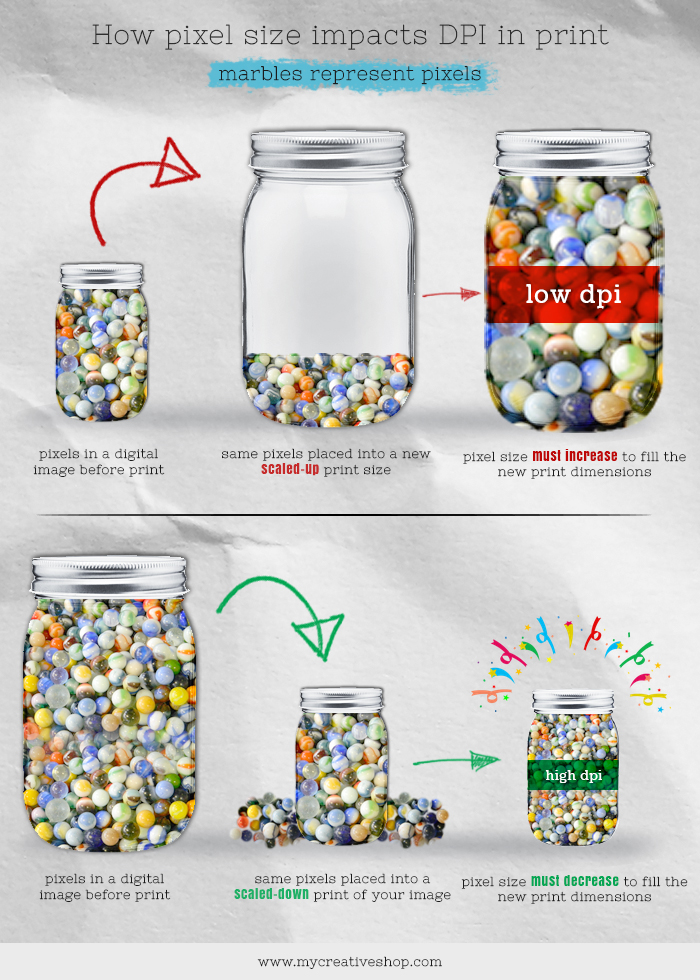
When it comes right down to it, the DPI of a printed image is a measure of how dense the image's pixels will be when printed.It's important to understand that regardless of how big or small you choose to print an image, the total number of pixels within that image remains unchanged.Instead, as you scale up your image, the DPI decreases and the printed size of each pixel increases. Scale up too much and you'll be left with a pixelated mess. We made this graphic to help explain how pixel size impacts DPI in print.
 Graphic put into text:
 Picture a jar of marbles. The jar is your image before you print, and each marble is a pixel. Now get a bigger jar. This new jar represents a scaled-up print of your image. What are the marbles going to do? They can't just leave all that empty space, can they? In order to fill the jar, the marbles have to get bigger, and the overall density (or marbles per square inch) decreases. In the same way, when you increase the printed size of an image, the pixels have to get bigger, so the overall pixel density (DPI) decreases. This process works in reverse as you scale down an image to print (the same marbles (pixels) have to fit in a smaller jar (picture frame), so they get more dense). To ensure a great print at any size, always start with the highest quality image possible (even a perfect DPI can't turn a low-quality image into a Rembrandt). As you size your image for print, we recommend aiming for a target DPI range of no less than 150 DPI. 300 DPI is considered ideal for printing anything that is meant to be held or viewed at a short distance [More on distance & DPI later].
Sidebar: If you're utilizing your own design software, don't be alarmed if your image's DPI is expressed as pixels/inch. It's still DPI.
Calculating DPI
To calculate what the DPI of a printed image will be, you ll need to know the pixel dimensions and desired print size of your image. Using either the image s width or height (the ratio remains constant as the image is scaled up or down), divide the number of pixels by the printed size (in inches). For example, an image with pixel dimensions of 600 x 900 printed at 2? x 3? will have a DPI of 300 (row 1 above), which is considered ideal for printing. Scaling up to 4" x 6" gives you a DPI of 150 (row 2 above), which is mid-range but acceptable. However, printing that same 600 x 900 image at 10? x 15? (row 3 above) will leave you with a DPI of 60, which is only going to bring you joy when seen at a distance (a face only a mother could love?).
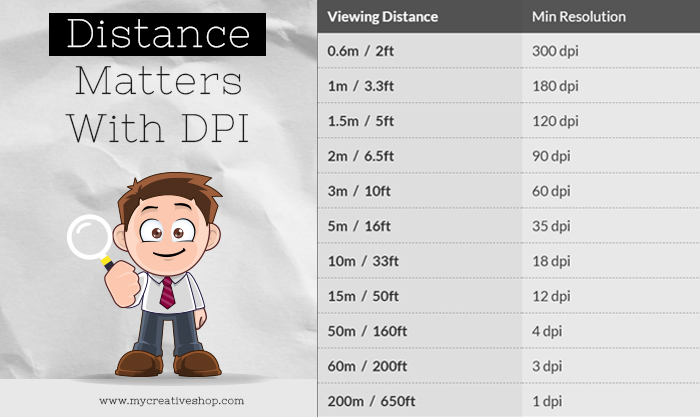
 Distance Matters With DPI
300 DPI is the ideal for most print forms that you can hold in your hand, but if you're looking to branch out to infinity and beyond, you can get away with printing images at a lower DPI (higher is always best, but it's not always feasible). Check out this handy dandy viewing distance & DPI chart or use the graphic below to ensure that your posters, banners, and even billboards are viewed perfectly.